
Get a Free Quote
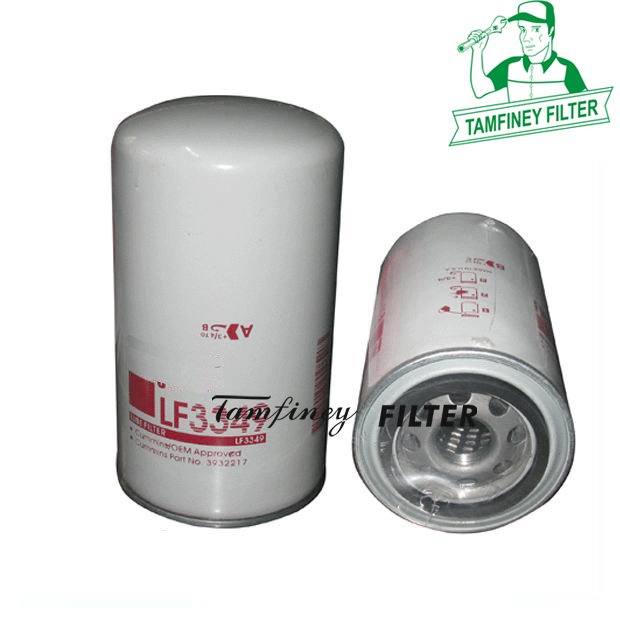
Hyundai Engine Filter LF3959 11E1-70140 LF3921 3908615 3914395
Your Best Hyundai Engine Filter LF3959 11E1-70140 LF3921 3908615 3914395 Oil filter manufacturer in China.
HYUNDAI 11E1-70120PB 11E1-70120 11E1-70140 11E1-70140-AS 11E170120 XKDE-01083 YUBP-00654 YUBP-00654-AS KESSBOHRER 83129995720 DOOSAN 65.05510-5009, 400508-00082, 65.05510-5028A JX0814 65.05510-5009S 65.05510-5015 65.05510-5021 400504-00082 Fleetguarad LF3959 LF3921 CUMMINS 3977910 3903264 3908615 3914395 3932217 3934430 3890708, 3932218, 3890710 5268935 3947813 3949561 ATLAS COPCO 1092322000 FIAT 151831112, 151831114 DAF CBU1124


| Oil Filter LF3959 11E1-70140 LF3921 3908615 3914395 Parameter: | |
| Part Number | LF3959 11E1-70140 LF3921 3908615 3914395 |
| Brand | Tamfiney |
| Weight | 631 g |
| Height | 174 mm |
| Outer Diameter | 93 mm |
| Inner Diameter/ Thread Size |
1-16 UN |
| Minimum Order | 100 PCS |
| Place of Region: | Zhejiang, China |
| Payment Terms: | T/T |
| Price Terms: | FOB |
| Lead Time: | 30 to 50 days based on order quantities |
| Market Type: | After Market |
| Current Export Market: | North America, South America, Western Europe, Eastern Europe, Africa, Oceania |
What is the LF3959 used for?
ATLAS COPCO QIS 115QIS 140QIS 65
AUSTOFT RECOLTEUSE CANNE A SUCRE
BENATI 3.223.22 BLC3.283.28
BOVA VDL FUTURA FVD 12-220
CAMOX F 140F 175 F
CASE 10881088 C11801188118812801640164418002022214423445130 MAXXUM5140 MAXXUM5150 MAXXUM5230 PLUSMX 100MX 110MX 120MX 135MX 150MX 170SP 2500 HCSP 2524SP 1805WX 170
CHALLENGER ROGATOR 544ROGATOR 554ROGATOR 663ROGATOR 664ROGATOR 844ROGATOR 854ROGATOR 854ROGATOR 854SPRA COUPE 165
CUMMINS 4 BT 6.16 B 5.96B5.9E6 B 5,9 M6BT5.9-1506 BT 5.9 DM6 BT 5.9-G26 BT 5.9-G26 BT 5,9 M6 BTA 5.96 BTA 5.9-G26 BTA 5,9 M6 BTAA 5.9-G126 BTAA 5.9-G2B SERIESEQB 210-20
CUMMINS POWER GENERATION GRPE ELECT 6 BT 5.9
Performance Hyundai Engine Filter LF3959 11E1-70140 LF3921 3908615 3914395
Q: What is the difference between LF3959 and LF3972?
- LF3959 (Early Model): Engineered for 1989–2007 Cummins engines, focusing on durability for legacy engines.
- LF3972 (Late Model): Designed for 2007.5–2018 Cummins engines, featuring modern, high-efficiency filtration.
Q: How to replace Hyundai Engine Filter?
Now let's talk about hyundai engine oil filter's replacement:
1. Preparation work
Park the vehicle on a level and solid ground, and tighten the handbrake.
For manual transmission models, shift into first gear; Automatic transmission model, shift into P gear.
Start the engine, preheat it to normal operating temperature (about 5-10 minutes), and then turn off the engine. Preheating can improve the flowability and thorough drainage of old engine oil.
Place a wooden wedge behind the front wheels to prevent the vehicle from sliding.
Use a jack to lift the front of the vehicle to the appropriate height and place a safety bracket under the frame to ensure safe operation. Do not rely solely on jacks to support the vehicle.
2. Discharge old engine oil
Find the oil drain bolt below the engine oil pan (usually a 15mm or 17mm hex head).
Place the oil pan directly below the oil drain bolt.
Use a wrench to loosen the oil drain bolt counterclockwise, and after the oil has completely flowed out, wipe the interface between the bolt and the oil pan with a cloth.
Important reminder: Some modern models (such as those equipped with Theta II or Nu series engines) are recommended to open the oil filler cap on the engine cylinder head cover at the same time when draining oil to balance the air pressure and make the oil discharge smoother.
3. Disassemble the old oil filter
The oil filter is usually located on the side or bottom of the engine and has a cylindrical shape.
Use an oil filter wrench to unscrew the old filter counterclockwise. If the filter is too tight, a specialized disassembly tool can be used.
After removal, check if the sealing ring of the old filter remains on the engine seat ring, and if so, thoroughly remove it.
4. Install a new oil filter
Apply a uniform layer of new engine oil on the rubber sealing ring of the new filter. This ensures sealing and prevents damage to the sealing ring during installation.
Align the new filter with the thread and rotate it clockwise by hand until the sealing ring contacts the engine seat ring.
Tightening torque: Usually, there is no need to use a wrench to tighten vigorously. After tightening by hand, rotate an additional 3/4 turn (about 270 degrees). The filter torque for some modern models (such as those equipped with 1.6T or 2.0T engines) is approximately 20-25 N • m. It is recommended to refer to the manual.
Attention: If the filter is installed horizontally, there is no need to inject oil in advance; If installed vertically, a small amount of new engine oil can be poured in advance to reduce dry grinding during startup.
5. Add new engine oil and check
Install the oil bolt and tighten it to the specified torque (usually 34-44 N • m).
Add new engine oil through the oil filling port using a funnel. Refer to the user manual for the filling amount, which is usually 4-6 liters.
After filling, wait for 3-5 minutes for the oil to flow back to the oil pan, then remove the dipstick and check the fluid level. The liquid level should be between the "MIN" and "MAX" marks, and it is recommended to add it above the centerline.
Start the engine and let it idle for 3-5 minutes, observing for any leaks (with a focus on checking the installation of the oil drain bolt and filter).
Turn off the engine, wait for another 3 minutes, recheck the oil level, and replenish if necessary.
Q: Can I clean and reuse my oil filter?
It is not recommended to reuse the oil filter after cleaning.
You're right to be cautious—cleaning and reusing an oil filter is a bad idea. Here's why, broken down clearly:
Oil filters are precision components with complex internal structures designed for specific engine demands.
The filter paper can tear or deform during cleaning, losing its ability to trap harmful particles.
Sealing rings may get damaged, leading to oil leaks that compromise engine protection.
Internal valves like the anti-drainback and bypass valves are delicate and can malfunction after cleaning.
Even if it looks clean, microscopic contaminants can remain and pollute your fresh oil.
It's not worth the risk—engine damage from a faulty filter costs far more than a new filter.
Always replace it with a new, high-quality filter during oil changes for reliable performance.
Stick to manufacturer guidelines to ensure your engine's longevity and efficiency.


